
Ansible Practice - Session 1
introduction to Ansible, its architecture, and basic concepts.
Ansible Practice - Session 1
Kemarin kita sudah bahas soal instalasi Ansible dan kenapa tools ini jadi andalan di dunia DevOps. Nah, sekarang saatnya kita langsung praktik! Bayangin kita punya website landing page pakai database MySQL, dan websitenya bakal dibagi ke dua server lewat load balancer Nginx. Seru kan? Yuk, kita coba bareng gimana cara pakainya!
Requirement
-
Ansible
-
Terraform
-
Akun AWS
Create VM EC2 AWS
kita buat VM menggunakan terraform ya, siapin file konfigurasi nya. Inget semua file konfig ini copy dari Terraform Doc.
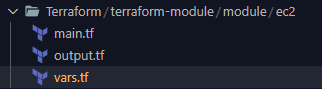
Struktur folder :
terraform {
  required_providers {
    aws = {
      source = "hashicorp/aws"
      version = "4.48.0"
    }
  }
}

provider "aws" {
  region = var.region
  access_key = var.access_key
  secret_key = var.secret_key
}

resource "aws_instance" "default" {
  ami           = var.ami
  instance_type = var.instance_type

  tags = {
    Name = var.name
  }

  associate_public_ip_address = var.public_ip
  subnet_id = var.subnet_id
  key_name = var.key_name
  vpc_security_group_ids = var.vpc_security_group_ids
}output "instance_id" {
value = aws_instance.default.id
}
output "public_ip" {
value = aws_instance.default.public_ip
}variable "region" {
type = string
default = "ap-southeast-3" //Region Jakarta
}
variable "access_key" {
type = string
default = "***" //buat User di IAM AWS
}
variable "secret_key" {
type = string
default = "****" //buat User di IAM AWS
}
variable "ami" {
type = string
default = "ami-0796a4cfd3b7bec87" //lihat AMI ID saat create instance EC2 AWS
}
variable "instance_type" {
type = string
default = "t3.micro" //lihat Instance Type saat create instance EC2 AWS
}
variable "name" {
type = string
}
variable "public_ip" {
type = bool
default = true
}
variable "subnet_id" {
type = string
default = "subnet-043160dc0c75a5d57" //lihat di VPC AWS bagian subnet group
}
variable "key_name" {
type = string
default = "***" //create Key di bagian IAM AWS
}
variable "vpc_security_group_ids" {
type = list
default = ["sg-03dab3277a1b07861"] //lihat di bagian VPC AWS
}jika sudah buat module terraform nya, next kita akan buat server nya.
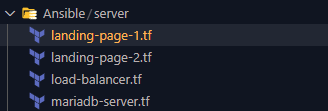
struktur folder:
module "landing-page-1"{
    source = "../Terraform/terraform-module/module/ec2" //arahkan source ke module ec2
    name = "landing-page-1"
}

output "landing_page_1_public_ip" {
    value = module.landing-page-1.public_ip
}module "landing-page-2"{
source = "../Terraform/terraform-module/module/ec2" //arahkan source ke module ec2
name = "landing-page-2"
}
output "landing_page_2_public_ip" {
value = module.landing-page-2.public_ip
}module "mariadb-server"{
source = ".../Terraform/terraform-module/module/ec2" //arahkan source ke module ec2
name = "mariadb-server"
}
output "mariadb_server_public_ip" {
value = module.mariadb-server.public_ip
}module "load-balancer"{
source = "../Terraform/terraform-module/module/ec2" //arahkan source ke module ec2
name = "load-balancer"
}
output "load_balancer_public_ip" {
value = module.load-balancer.public_ip
}dan jalankan command.
~/server$ terraform init
~/server$ terraform plan
~/server$ terraform apply
Create Config Ansible
Semua konfigurasi dapat di lihat di sini Ansible Builtin, atau dengan keyword di google jika contoh ingin apt update tinggal ketik saja ansible apt.
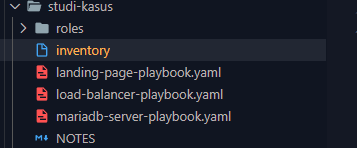
struktur folder :
inventory
[landing-page]
108.137.44.176
108.137.123.14

[load-balancer]
108.136.230.0

[database]
108.137.62.183

[all:vars]
ansible_user=ubuntu
ansible_ssh_private_key_file=.../***.pem //private key extensi .pem di dapat saat create IAM User
Create Roles Update-OS
next kita bikin roles update OS, buat folder di folder roles dengan nama update-os, dan di dalam folder update-os create folder tasks.

main.yaml
- name: update server linux Debian/Ubuntu
  shell: apt update
  when: ansible_distribution == 'Debian' or ansible_distribution == 'Ubuntu'


- name: update server linux redhat/centos
  shell: apt update
  when: ansible_distribution == 'CentOs' or ansible_distribution == 'Red Hat Enterprise Linux'
Create Roles Nginx
next kita bikin roles install Nginx, buat folder di folder roles dengan nama Nginx, dan di dalam folder Nginx create folder tasks.

main.yaml
- name: install service nginx
  apt:
    name: nginx
    state: present
Create Playbook Landing Page
landing-page-playbook.yaml
- name: setup landing page server
  hosts: landing-page
  become: yes
  roles:
    - roles/update-os
    - roles/nginx
dan jalankan command
~/studi-kasus$ export ANSIBLE_HOST_KEY_CHECKING=false
~/studi-kasus$ ansible-playbook -i inventory landing-page-playbook.yaml
cek apakah di server sudah terupdate OS dan sudah terlihat web server Welcome to Nginx.
Conclusion
Ansible adalah alat yang sangat berguna untuk mengelola infrastruktur dan aplikasi secara otomatis. Dalam sesi ini, kita telah belajar cara membuat VM di AWS menggunakan Terraform, mengonfigurasi Ansible untuk mengelola server, dan menjalankan playbook untuk menginstal Nginx pada server landing page. Dengan pemahaman dasar ini, kita dapat mulai membangun infrastruktur yang lebih kompleks dan otomatis.